Showing posts with label Tutorials. Show all posts

September 13, 2014

Embroidery Garden has partnered up with Craftsy to bring you news about exciting, fun and informative machine embroidery classes at discounted prices.

Try this class for free!

December 11, 2013

Another 'Snow' Cute Gift Idea

You can never have too many snowman ideas :)
Here's a cute, quick, inexpensive gift .
I got the small red tub and white bath scrubbie from Dollar Tree.
The body wash (with label removed) is from Target.
I cut the snowman face and the snowflakes from vinyl using my Cricut.
I'm going to wrap it in cellophane, add a bow and cute gift tag for my neighbor.

December 3, 2013

Snowman Yard Stake Holiday Idea

While standing in line at a Dollar Tree store this summer, I looked over and saw some small solar powered yard lights.
Immediately I thought it looked like a snowman :)
After hanging on to the light all summer and fall, I got it out last week and made this.
I cut a small snowflake and the face from vinyl using my Cricut and applied them to the light.
A scrap of burlap was used for the scarf.
The vase is filled with florist foam soaked in water.
I stuck the light in the center and added fresh holiday greenery all around it.
Set him by a window to absorb sunshine and at night he will light up!


December 16, 2012

Snowman Cups

I saw this idea on Pinterest earlier this year and knew I'd use it at some point.
These 2 are some of the ones I made for my family.
I added the names cut from vinyl on my Cricut so I could tell them apart.
I'm putting the small gifts in them.

I'm also making these for the residents at my Mom's assisted living facility and filling them with candy for the holidays. I'm not adding names to those.
They're quick to make with a little paint and a triangle of felt glued on for a nose.


December 14, 2012

Sock Monkey - Whoo Wha!

You might remember the Memory Bears I made my cousin's kids after my Uncle (their Grandfather) passed away using his old shirts.
Well, one of the girls found a pair of his socks and wanted a sock monkey made from them.
I've never made one before but knew I was going to try :)
 
I used the instructions from Craft Passion. They have some adorable sock monkeys on their site.
 
Here's how mine turned out. I decided to make him a hat from fleece and use some of the leftover buttons from the shirts on it.
 
I ♥ him!

December 6, 2012

Gift for Mom

At Christmas I try to make something special for my Mom.
Mom was always crafty - guess that's where I get it from :) - but now with her memory failing, she's not able to do things she used to.

I know she will ♥ these plates.

I've done her room in black and white with touches of pink.
When I saw these plates at the thrift store with the tiny pink flowers, I knew exactly what I wanted to make for her.
These will hang on either side of her bed.
There's a large floating frame monogram with scrolls I made her a few years ago that is directly above her bed.
It's going to look great!
 
The butterfiles were cut using my Cricut machine and the files are from myvinyldesigner.com
I'll try to post a photo of these hanging up in her room after the holidays.

July 19, 2012

How I Monogram Converse Shoes

I monogrammed another pair of Converse shoes and this time I wrote a tutorial on how I did it.
I got the shoes @ Target for about $35.00
They're fun & quick to do.

You can view the PDF by clicking HERE


March 15, 2012

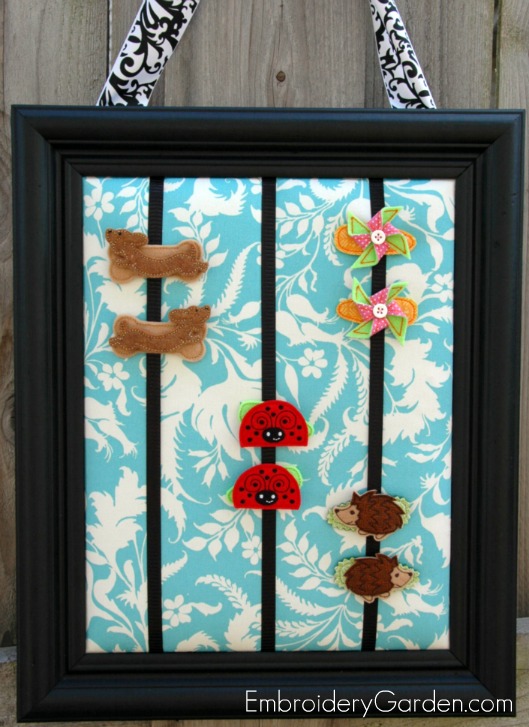
Easy & Cheap Frame Hair Clippie Holder

Since I've been making a few Felt Hair Clippie designs, I thought I'd make something to display them on. My Frame Clippie Holder was easy, cheap and quick to make.
 I had all the supplies on hand.
The frame had been laying around in the basement for a few years. A little spray paint spruced it up.
I think it turned out cute and serves the purpose I intended it for.

Download my PDF instructions for making this easy project HERE

December 31, 2011

Felted Slippers

I've made 2 pairs of these felted slippers and I love them! They're so warm and comfy.

I took an online class @ Craftsy with Betz White. They're very easy to make and stitch up quick.
You 'felt' old wool sweaters by washing them in hot water & soap. They become dense and don't ravel.
The ribbing on the bottom edge of the sweater is used for the cuff on the slippers.


On the striped pair I used jiffy grip on the soles. I embellished them with scraps left from the sweater.


I need to hit the thrift stores for more sweaters!


July 21, 2011

Ruffled Bracelet Project


My Ruffled Bracelet project is quick & easy to make.

It would make a great 'learn to sew' project for girls.

You can download my PDF instructions from my web site, Embroidery Garden
Click on Free Projects and look on page 2.

Click Download at the bottom right to save the PDF to your computer.


April 27, 2011

Felt Daisy ~ Sweet for Mom & more


I'm lovin' felt flowers. After making these I knew I wanted to make more.


I created this machine embroidery felt daisy & leaf design and think the possibilities with it are endless.


You can use them as hair clips, pins, magnets, to decorate packages, totes . . . and on & on


You can download these free machine embroidery design files from Embroidery Garden Yahoo Group until the end of May 2011.

You can also download my free Fringe Alphabet Button Covers (shown with the letter A) from my Machine Embroidery Ad List Yahoo group.

April 19, 2011

Felt Flower Pin & Magnet


These were so easy and fun to make.

They'll make nice gifts and favors. Perfect for Mother's Day!
I digitized a leaf to add to the flowers.

You can download my instructions (PDF) and leaf file
HERE


November 21, 2010

"6 Mondays of Snowmen" PROJECT 3


It's Monday again :)

Project #3 ~ Toilet Paper Snowman

Isn't he a cutie?

His body is made using toilet paper rolls easily covered with fabric!
There's minimal sewing involved - just his nose & his hat (if you want).
I used the sleeve from a child's sweater for the hat on mine :)

You can download this project from EG's Yahoo group

November 14, 2010

"6 Mondays of Snowmen" PROJECT 2


Project #2 ~ Snowman Garland

Use this adorable Snowman Garland to decorate your mantle, tree, windows, etc.
The 3 snowman faces are machine embroidery.

PDF instructions are included.

You can download this project from EG's Yahoo group

November 8, 2010

"6 Mondays of Snowmen" PROJECT 1


Today officially starts my "6 Mondays of Snowmen" series!

Every Monday for 6 weeks, I will upload a snowman project.
All types of craftiness will be involved.

Project #1 ~ Tic Tac Snowman
This little guy would be great for small gifts (neighborhood kids, mailman, etc), classroom parties, favors etc.

You can download this project from EG's Yahoo group

October 11, 2010

Candy Corn Fleece Hat ~ Sweet


Why did my kids have to go and grow up on me?
Both of my boys would have looked sweet in this little Candy Corn Hat I made.

It was quick & easy to make. I made a newborn size, but it could easily be made into any size.

Click HERE to download my instructions to make your own 'sweet' little hat.

April 20, 2009

Baby Animal Faces - New Design

I've just finished a new machine embroidery applique set, Baby Animal Faces. The designs match my popular Baby Wrist Rattles Set.


I created cute little 'peek-a-boo' boxes to hold folded side snap shirts (newborn 0-3) embroidered with my designs.
I cut these on my Cricut Expression. You can download the .scut files & a PDF with instructions here.


Another idea is to fold the shirts and put them inside of little baby bottles!


I got the bottles ('the first years Soothie') @ WalMart.
Fold the shirts so the faces show nicely & pop them inside. Tie a cute ribbon around the tops and they're so cute!


I added a cute ruffle to the bottom of one of the shirts to match the 'Baby Girl' applique design.


Here's how I did the ruffle for a side snap shirt:
Measure around the shirt and add at least 1/2 of the length to the measurement. Cut a 4" wide strip to this length. You will have to piece it.
Fold the strip in half lengthwise, wrong sides together, and press.
Fold the ends to the inside and press.
Run a basting stitch along the long raw edge. Gather up edge to the approximate length of the bottom measurement of the shirt.


Cut another strip that is 1 1/2" wide the length of the measurement around the bottom of the shirt + 1". Fold the strip in half lengthwise, wrong sides together, and press.
Fold each end in 1/2" and press.
Sew the strip to the ruffle. Have the right side of the strip against the back of the ruffle:


The fold on the strip is even with the edge of the ruffle.
Next fold the strip to the front side of the ruffle. The pressed center fold mark is at the top:


Fold the raw edge under & press & pin


Pin the ruffle to the bottom edge of the shirt. I placed it along the stitching line on the shirt.


Sew close to both edges and you're done!