July 28, 2012

Burlap Project 1

I have quite a bit of burlap left over from making my Christmas Stockings last year. I'm going to try and use some of it up before the year is over.
I hadn't embroidered on it before but it was super easy.
Here's the new insert for my coffee tumbler I made.
The insert is reversible with a fall print on the other side.
I backed the burlap with Decor Bond to make it more stable and used Solvy on top when I embroidered the letter.
I have the blank Travel Tumblers on my site for sale.


July 19, 2012

How I Monogram Converse Shoes

I monogrammed another pair of Converse shoes and this time I wrote a tutorial on how I did it.
I got the shoes @ Target for about $35.00
They're fun & quick to do.

You can view the PDF by clicking HERE


July 15, 2012

Oh Baby!

Still on a roll with my original Flameless Tealight Cover designs, I created a set for Baby.
These designs fit snugly over small battery-operated tealights.
How adorable would these be a table decorations at a shower?!
You can read more about this cute set & purchase the design files HERE


 Love the stork :)


I also designed matching Baby Hershey Nugget Candy Holders!
These design stitch up quick. Each one holds a Hershey nugget candy bar.
Perfect shower favors or a unqiue way to announce the arrival of a new little one.

These would be cute for the popular "Gender Reveal" parties modern Moms-to-be are having now.
Read more about this set and purchase the files HERE


Wishing I had a grandbaby on the way  . . .  :)


June 7, 2012

Summer Flameless Tealight Covers

My new set of original Flameless Tealight Covers would look great at your Summer parties.
These designs stitch up quick 'in your hoop'.
The covers fit snugly over small battery -operated tealights that you can purchase at dept stores, etc.
Read more about my Summer Tealight Covers set and purchase the files HERE


June 3, 2012

Sewn Gift Bags

I bought this pattern from Fabrications by Doris back in the Spring.
It has 2 sizes of gift bags in it. They were easy and fun to make.
I like the fused embellishments you can add to them, but the next time I make them I want to embroider monograms on the fronts.
I like how they're sturdy enough to stand up on their own and absolutely love the grommets for the ribbon handles.
The possibilities are endless with fabric choices.

May 25, 2012

Monogram My Converse . . . oh yeah

I picked up these shoes at Target yesterday with the intent of trying to monogram them.
It was a little tricky getting them set up on the hoop, but I love how they turned out.
I think I'm going back for a pink or gray pair :)
The way I have them tied, I can just slip them on and off.
They're my new favorite shoes ♥


May 17, 2012

Gorgeous Flowers ♥

Done planting your flowers?
Now it's time to makes some on your embroidery machine!
My new Silk Rose Petal Flowers are made 'in your hoop'.
The finished flowers measure 6"~10" across and make a big impact.
You can create them directly onto fabric, like I did for this pillow.
The flowers are full & dimensional.
Or you can make them free-standing and use them as pins, etc. like I did on this hat from Target's dollar spot.
Read more about this fun, creative set or purchase the files HERE

May 11, 2012

WhOO goes there

My Large Owl Case designs are quickly becoming another popular machine embroidery design on my web site. I don't think people's love affair with owls is going away any time soon :)
I created these designs for the big hoops. You get 3 different sizes in the set. The largest size will hold a Kindle Fire.
They're fully lined and completely 'made in the hoop' with NO raw edges inside!

Click HERE to read more or putchase these fun & unique designs


April 23, 2012

On the Cover ~ 'Berry' Sweet Indeed!

My Applique Strawberry design is featured on the cover of Sew Beautiful Magazine!
Issue # 142, 2012  Vol.26, #3
My design was also used on a shirt too in the article.
It's a really cute issue full of great baby ideas and a few free patterns.
You can find my Applique Strawberry design here:

April 17, 2012

Memory Bears

One of my uncles died back in December. He was my favorite :)
My aunt came to visit recently and brought me several of his shirts.
She wants me to make bears for each of their grandkids from them. There are 2 boys & 3 girls.
Here are the bears I made for the boys.
I used an old McCalls pattern (#2271)
I cut the collars off the shirts and hemmed the bottom edge of them.
They buttoned around the neck and fit perfectly.
My uncle was a volunteer fireman. His fireman patches are sewn on the bellies :)

I sewed pockets from the shirts onto the back side of the bears.
My aunt will write notes to each of the kids and put a photo of them with my uncle inside the pocket.
I think they turned out pretty special. They went out in the mail today.
I'll start the ones for the girls soon. I'm thinking about adding raggy flowers to them using leftover scraps.

April 3, 2012

Butterflies x 3

I used shadow boxes to create these dimensional butterfly scenes.
The butterfly silhouettes were cut on my Cricut from cardstock. I ran them through a Cuttlebug to emboss some with swirls and some with dots.
I could have cut the branches from vinyl using my Cricut, but I cheated a bit :)
JoAnn's has pre-cut vinyl designs and I saw one that was a close match to the design in the sheers in my daughter-in-laws office / spare bedroom. I use a 50% off coupon and bought it for $7.00.
I then took it and cut the branch into 3 main pieces and a couple of smaller ones.
I cut textured white artist's posterboard (also from JoAnns) to fit the back of the shadow boxes.
I applied the vinyl branches to the posterboard.
A small crease in the middle of each butterfly gave it some dimension and a small round sticky dot lifted it slightly off the posterboard.
They look really nice in person. The butterflies are in shades of purple and silver and black.
Hung on the purple wall, the frames really pop.


March 15, 2012

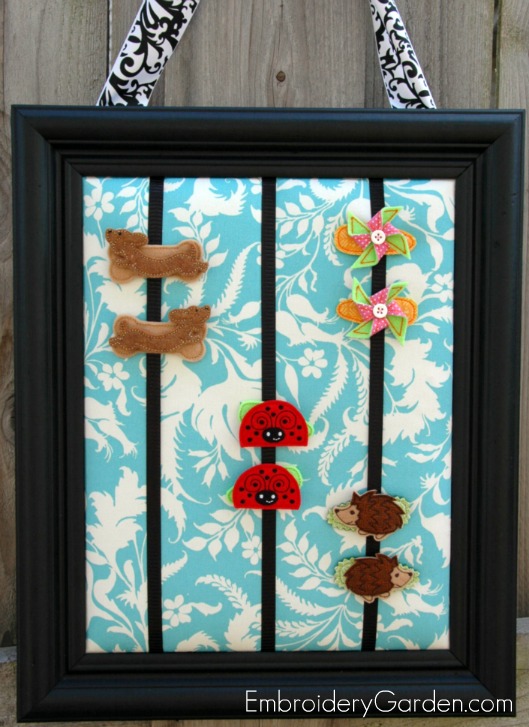
Easy & Cheap Frame Hair Clippie Holder

Since I've been making a few Felt Hair Clippie designs, I thought I'd make something to display them on. My Frame Clippie Holder was easy, cheap and quick to make.
 I had all the supplies on hand.
The frame had been laying around in the basement for a few years. A little spray paint spruced it up.
I think it turned out cute and serves the purpose I intended it for.

Download my PDF instructions for making this easy project HERE